Friday, April 25, 2014

Photo Of The Day (via magicseaweed.com)


 Pipeline & Backdoor

Spot Location: Hawaii > Oahu > Pipeline & Backdoor

Date Taken: 12th April 2014. 2964 page views since 22nd April 2014.
Ernesto Borges's avatar

7 Daily Exercises that Will Help Make You a Better Photographer (Via petapixel.com)

exercises1
The saying ‘practice makes perfect’ is as valid for photography as any other activity, so we’ve put together a collection of exercises that will help you become a better photographer.

1. Spot meter

Modern metering systems have great general-purpose modes, often called Evaluative, Matrix or Multi-area, which do a great job of accessing a scene and setting good ‘average’ exposure settings in many situations.
However, they’re not 100% foolproof and very dark or very light scenes, or backlighting can trick them into over or under exposure. They’re also not psychic and don’t know what you’re seeing in your head when you take a shot.
Switching to spot metering puts you in control of where the camera meters from and helps you develop a much better understanding of the tonal range in a scene.
A standard spotmetering system allows you to meter from a very small part of the scene and it suggests exposure settings that will render your target a mid-tone. Consequently, you need to take care with the positioning of this spot, study the scene carefully and decide which is the best area to take a reading from.
It’s often helpful to combine spot metering with AE Lock as this will fix the exposure settings (after metering) while you compose the image.
foodapp_9.JPG

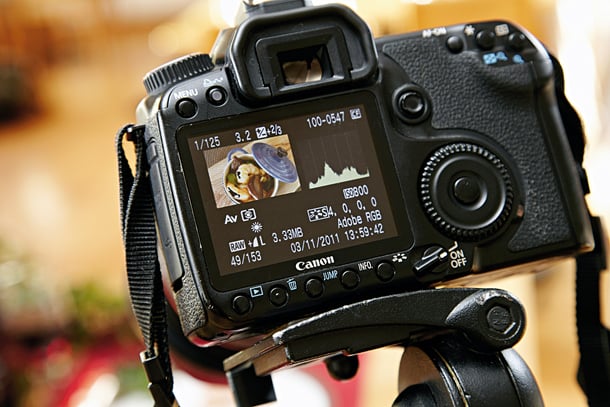
2. Check the histogram

Just like the Levels display in image editing software packages such as Adobe Photoshop, a camera’s histogram display is a graph that represents the brightness of the pixels that make up an image.
The scale runs from black, with a brightness reading of 0, on the left to white, with a brightness reading of 255, on the right.
The peaks in the histogram indicate the number of pixels with that brightness and a large peak means lots of pixels have that brightness. This means that a vary dark image will have peaks over to the left of the graph, while a bright one has peaks on the right.
Meanwhile, a correctly exposed ‘ideal’ scene has a histogram with a so-called ‘normal’ distribution with a peak in the middle and just a few very bright and very dark pixels.
Checking the histogram after every shot will increase your understanding of the brightness distribution of an image. It will also enable you to determine whether an image is under- or over-exposed with the majority of pixels being grouped to the left or right of the graph respectively.
prime_2.tif

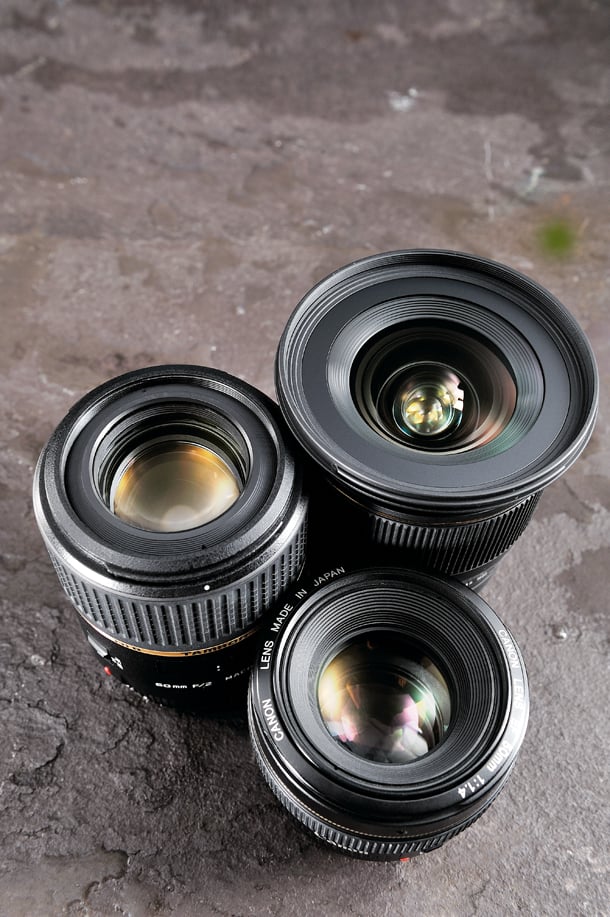
3. Use a single prime lens

Using a prime, or fixed focal length, lens enables you to forget about the distraction of zooming in and out. Instead you walk towards a subject, assess it through the viewfinder and then either shoot or move again to find a new or alternative vantage point.
It forces you to explore the subject more fully you’ll soon get a better understanding of the angle of view of the lens.
As well as letting you travel light, if you take just one lens with you on a shoot, or day out with your camera, you’ll really get to know that focal length and in the future you’ll be able to decide which lens to mount on your camera just by looking at the scene and framing an image in your mind.
exercises4

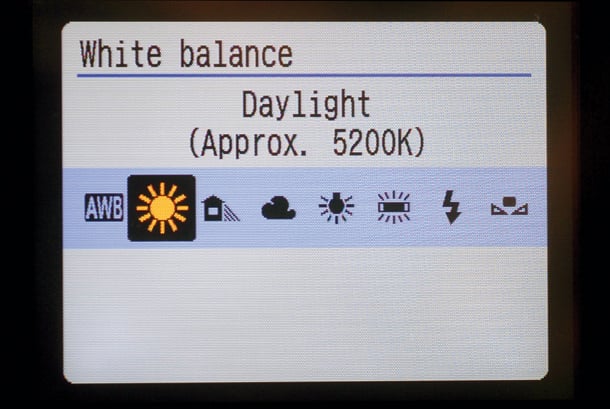
4. Set a specific white balance

Modern automatic white balance systems are extremely capable, but that’s not always a good thing because it can mean that you shoot with your mind in neutral (ha!) as far as colour goes. This may be fine much of the time, but if the camera delivers a result that you don’t like, you may find yourself a little stuck for answers.
The answer is to climb free of the auto white balance safety-net and set a preset white balance value for the appropriate lighting conditions.
You may find that the Daylight or Sunny white balance setting produces the best results for the majority of the time, but it’s worth experimenting with the others to assess their impact in a range of conditions so that you know when to use them in the future.
exercises5

5. Set a custom white balance value

It’s easy to set the custom white balance value of a camera, you just set it to the correct mode (the manual will explain how to find this) and then photograph a white or neutral grey card in the same light as your subject. Well that’s the theory.
In practice it can be little trickier, because the angle at which you hold the card can have a huge impact upon the final result.
If the main light is coming from directly above your subject, for example, and you tip the card slightly downwards towards a coloured area under your subject you will find the result is very different to the one you get if you hold the card slightly tipped upwards.
Learn how to make a custom white balance setting with your camera and experiment by holding a white balance card at different angles to see for yourself and learn. If you find you don’t like the neutral look of images that your camera produces in this mode, try the adjustment controls until you find a setting that works for you.
DCM123.shoot_basics.manual 6a83e55eedcc41b9b62951fe37780201

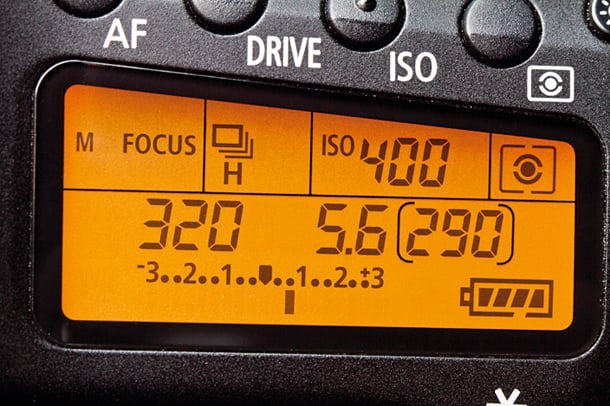
6. Use manual exposure mode

Although aperture and shutter priority exposure modes are very useful, they leave the decision about how bright or dark the image will appear to the camera.
Manual exposure mode puts you in charge and it forces you to think about the brightness of a subject and its surroundings. It also means that you have to consider both depth of field and freezing or blurring movement.
It can be helpful to combine this exercise with using spotmetering as it will enable you set select exposure settings that work for a specific part of the scene.
exercises7

7. Post a single image every day

Rather that shooting in a sporadic fashion and positing images to Facebook, Twitter, Flickr, Instagram or any other social networking or image sharing site as and when you feel like it, try committing to shooting at least one image and posting only one shot every day.
This will encourage your powers of creativity, helping you to find novel subjects and explore new areas or genres of photography. It will also mean that you have to critically assess each image to identify the best shot from that day to post.
Wherever you post your image, make it known what you are doing as this will underline your commitment.
It’s also often a good idea to request constructive criticism to help you see your shots from another viewpoint and improve as a photographer.

About the author: Jeff Meyer is the editor of Photoventure, a photography blog for everything post-capture — improving photos, image management, sharing and more. This article originally appeared here.

Thursday, April 24, 2014

awkwardsituationist (via http://slangdoctor.tumblr.com and americanostupido)

to avoid paying a construction fee, jack mubiru, a father of the skateboarding scene in uganda, fabricated a story about building a private enclosure for a pet crocodile. most local officials and neighborhood residents had never heard of skateboarding. yet six years later, the sport has spread from the skate park to the streets, attracting children as young as five and adult women.  
photographer yann gross always takes his deck with him on his journeys. during one trip to eastern africa, yann encountered a group of skaters in kitintale, a suburb of kampala, who had built the first and only half pipe in uganda. he ended up spending several months with the skaters, becoming a full member of the group, documenting a unique skate culture that, given the area’s contingencies, has styles and tricks all its own.  
text adapted from joel vacheron and julie bosman   

Wednesday, April 23, 2014

A Bored Sport (Via the surfer's journal)

Photo: Jim Mahoney
By Jim Mahoney
In the mid-’70s skateboarding finally got a foothold, and didn't let go. The urethane wheel, sealed bearings, and the kicktail were the answer, and skateboards haven't changed much since. In 1975, I published Skateboard magazine and promoted the magic rolling board in every way possible. We ran the United States Skateboard Association and held every type of competition you could imagine. The events were freestyle, slalom, speed run, bowl-riding, vertical, past-vertical, pipe, bank-slalom, high-jump, barrel-jump, and wall-ride. We featured each of them in the magazine. Then the question was: what else can we do on a skateboard?
We went through a tunnel of fire, rode them to launch on a hang-glider, put on ice blades, attached a sail, put a skyrocket on the bottom, drilled holes in the axels and glue lighter flints in the holes to grind and spark, and so on.
I skateboarded before I surfed. The body positions are similar—the bottom turn, the cutback. So next we made this combo kit to unite the two sports—mounting a 28-inch Kanoa skateboard on a ’70s single-fin pintail. We tested it for the first time at Royal Palms in San Pedro. The first rider up was the reigning world skateboard champion at the time, Russ Howell, but he was unable to make the transition. Then a talented local goofyfoot, Dwane Forester (pictured), finally did the deed consummating the marriage of the sports.

Saturday, April 19, 2014

How I Got the Shot: Surfer Greg Long’s stealthy ride (Via Grind TV)


This week’s “How I Got the Shot” takes photographer Todd Glaser to an undisclosed location with big-wave surfer Greg Long, proving that secret surf spots still exist among the chosen few who surf them.
Greg Long surfing his secret spot; photo courtesy of Todd Glaser
Name: Todd Glaser
Age: 28
Hometown: San Diego
Bio: Todd Glaser wanders the world with his camera, one step at a time. Based in his hometown of San Diego, his work has taken him to remote surf spots in Fiji, Tahiti, Indonesia, Mexico, and many other places.
As a staff photographer for Surfer magazine, Glaser has captured some of the biggest names in the surf world and photographed some of the world’s most famous and dangerous waves. Featured in the 2010 release “Surfer Magazine: Fifty Years,” Glaser was awarded a Follow The Light Foundation grant in 2008 and won the Surfer Magazine Photo of the Year in 2009, among numerous other awards.
Who: Greg Long
Where: A secret spot
Why: I chose this image because this trip was the first of many that I have been fortunate enough to share with both Greg Long and his brother, Rusty Long. They invited me to chase this swell with them, but never told me where we were going, or how long it would take to get there. I was under strict orders to keep the location a secret, as both the two brothers spent quite a bit of time trying to find this wave.
Being entrusted with their secret, it was important to me as a photographer to document them riding their discovery the best I could, without revealing anything about where we were. As a result, we were able to create this image together. To this day it is one of the most memorable wave missions I have ever been on.
What the image was shot with: Digital Canon camera, Del Mar Waterhousing, and a 10mm fisheye
Magazine affiliation: Surfer magazine
Sponsors: None currently, but I wouldn’t turn down a new friend at Canon or Leica!
Instagram: toddglaser
Facebook: https://www.facebook.com/ToddGlaserPhotography

The Wrist Pod for Waterproof Cameras

This is a handy gadget for a waterproof camera (like my olympus). It's also for people that can't afford a GoPro or larger high end cameras that require waterproof housings. I think it's worth looking into, check it out-

The Wrist Pod is a unique camera accessory that allows you to attach any camera to your wrist and wear it. Its heavy duty neoprene strap will hold your camera tightly to your wrist when swimming, paddling or climbing and your camera will tilt up at a moment's notice when you want to take a picture or video.

Originally designed for surfing, the Wrist Pod is perfect for all sorts of sports and activities where pockets, quick access, or dropping your camera are a concern.
The Wrist Pod's patented design utilizes your camera's universal tripod mount, so no additional parts or modifications are necessary and it only takes a few seconds to mount up.


Easily attach any camera with no modification needed.  (Uses camera's universal tripod mount)
Never worry about dropping your camera, and always be ready to capture the moment.
Pay Pal Button

Tuesday, April 15, 2014

Essential Underwater Photography Tips from Sarah Lee (Via the SmugMug Blog)


Water photographer Sarah Lee (recently featured in a behind-the-scenes artist profile for our SmugMug Film series) grew up in Hawaii, surfing and swimming competitively. One day, while at a swimming competition, she was handed a camera and hasn’t looked back since. She finds inspiration in the unpredictability of nature, creates art that captures the interplay of people, water, and light, and uses photography to find beauty in the chaos. If you want to take the plunge into underwater photography, check out Sarah Lee’s essential underwater photography tips below, plus get a close look at her underwater photography gear kit.
Underwater Photo Tip #1: Ask your models to channel their inner ballerina or yogi and trust them. Open body posture is key. This photograph was taken of adventure model and soul surfer,Alison Teal, somewhere in the warm waters of Fiji.
Photo Credit: Sarah Lee

Underwater Photo Tip #2: I find it ideal to photograph people underwater in the late morning between 8-11am because you’re going to need a lot of natural light being underwater. Though, on occasion it’s fun to experiment with different times of day. This photograph was taken during the last hour of the day, probably in the presence of a few sharks too shy to make themselves known.
sml_5437
Photo Credit: Sarah Lee

Underwater Photo Tip #3: Skin tones look the best within 1-5 feet of the surface. Beyond that, you start to lose the warmth and reds in their skin tone.
Photo Credit: Sarah Lee

Underwater Photo Tip #4: Lately I’ve been using an Outex, which is a silicone water cover. It’s rad because you can use different lenses in it, and it has a tripod neck strap. It’s worked really well underwater in lots of different situations.
Photo Credit: Mark Tipple

Underwater Photo Tip #5: You don’t always need a fancy camera or underwater setup to take a good photo. This photograph was taken on a GoPro. Read more about shooting with a GoPro on my blog.
Photo Credit: Sarah Lee

Underwater Photo Tip #6: Working with props and clothes can be challenging underwater but worth the effort! In this shoot, I created a jellyfish from an umbrella, ribbons, and beaded curtains. Just be careful you don’t lose anything in the process!
Photo Credit: Sarah Lee

Underwater Photo Tip #7: Within the realm of underwater photography, there’s not much in your control. It’s all about being in the moment and finding the composition within the “chaos.” Most of my favorite photographs were taken when I just let things “be” and used my camera as a way to interpret what is happening at the present moment, rather than trying to orchestrate and control any of it.
Photo Credit: Lucia Griggi

Underwater Photo Tip #8. Protect your gear. I alternate between surf housng and water covers depending on the conditions I shoot in.
sarahlee-watergear (2)
Photo Credit: Sarah Lee

Want more?

Read our exclusive interview with Sarah Lee. You can also check out the SmugMug Films artist profile of Sarah Lee below. Thanks for the tips, Sarah!
Find Sarah online: